Choosing the Right Materials for Your Tutu Skirt
Diy tutu skirt! Choosing the right materials is essential to make a beautiful diy tutu skirt. The fabric and elasticity are two critical components that define the skirt’s comfort and volume. Your choice in materials will impact both the look and feel of the final product.

Selecting Fabric: Tulle vs. Organza
When selecting fabric, tulle and organza are popular choices for a tutu skirt. Tulle is the traditional choice. It is lightweight, has a net-like look, and adds volume with less fabric. Organza is also lightweight, but it’s stiffer and offers a shiny sheen. For a fluffier tutu, choose tulle; for more sheen and structure, go with organza. The type of dance or occasion can guide your fabric choice.
Finding the Perfect Elastic for Waistband
A comfortable fit is vital, so finding the perfect elastic for the waistband matters. It needs to be wide enough to hold the skirt securely without digging into the skin. Also, ensure the elastic is flexible enough to permit easy movement. Stretch the elastic around your waist before choosing, to test the comfort level. It should be snug but not tight. This will ensure that your diy tutu skirt stays in place while dancing or moving around.
Understanding Tutu Skirt Measurements
To craft your perfect diy tutu skirt, getting precise measurements is key. Good measurements ensure the tutu fits comfortably and looks just as you envision.
Measuring Waist and Desired Length
First, you need to measure where the waistband will sit. Use a soft tape measure for comfort and accuracy. Wrap the tape around your waist and jot down this measurement. Next, decide on the tutu length. Measure from the waist down to where you want the skirt to end. Remember, for children or for a ballet-style tutu, shorter lengths work well. Write down this second measurement too. These measurements are crucial as they will guide the amount of material you need.
Calculating the Amount of Tulle Needed
To calculate the amount of tulle for your diy tutu skirt, use the waist and length measures. Here’s a simple formula: Multiply the waist measurement by three for sufficient fullness. Then multiply the length by two for the number of layers. Take these two numbers and put them together. This gives you the total area of tulle needed for your tutu. It’s good to buy a little extra. You may want more fullness or might make a mistake while cutting. Remember, it’s better to have more tulle than not enough. Keep these calculations handy for the next step: cutting and preparing your tulle.
Cutting and Preparing the Tulle
Once you have your materials and measurements, the next step is cutting and preparing the tulle. This stage sets the foundation for how your diy tutu skirt will look and flow. Use sharp scissors or a rotary cutter for clean cuts and work on a flat surface.
Tips for Cutting Tulle Evenly
Cutting tulle evenly is vital for the skirt’s appearance. Here are some tips:
- Fold your tulle in layers to cut multiple strips at once, saving time and ensuring uniformity.
- Use a cutting mat with grid lines as a guide to keep your cuts straight.
- Pin the tulle to a pattern or template you’ve created from cardboard to maintain the same length across all strips.
- Keep your scissors or rotary cutter sharp to avoid snagging the delicate fabric.
Maintain patience and provide ample room for the cutting process. Rushed or cramped conditions can lead to uneven strips.

Preparing Tulle Strips for Assembly
Once you’ve cut your tulle, it’s time to prepare the strips for assembly:
- Make sure the strips are free of any jagged edges; trim them if necessary.
- Stack the tulle strips in piles to keep them organized and ready for the next step.
- Consider ironing the tulle gently with low heat to remove any wrinkles, but do this carefully to avoid melting.
Preparation is all about making the next steps smoother. Organized and smooth tulle strips will make assembling your diy tutu skirt much easier and more enjoyable.
Creating the Waistband
Creating a comfortable and secure waistband is a critical part of your diy tutu skirt project.
Sewing vs. No-Sew Options
When it comes to crafting the waistband, you have two main options: sewing or no-sew.
- For a sewn waistband, you’ll need a sewing machine or needle and thread. First, measure and cut the elastic according to your waist size. Then, overlap the ends and sew them securely. Sewing ensures a durable and long-lasting waistband.
- The no-sew option is quicker and doesn’t require sewing skills. Use a stretchy elastic band that fits comfortably around your waist. You can simply tie the ends together or use fabric glue to bond them. The no-sew method is ideal for quick projects or if you’re not confident in your sewing abilities.
Attaching Elastic to Tulle
Once your waistband is ready, you’ll attach the tulle strips. Here’s how:
- Lay the elastic flat on a work surface. If you’ve sewn the waistband, make sure the seam lies flat.
- Take a tulle strip, fold it in half to find the midpoint, and place it under the elastic.
- Pull the loose ends of the tulle over the elastic and through the loop created by the fold. Pull tight to create a knot at the top.
- Repeat this with all the tulle strips, ensuring they are tightly packed for fullness.
Ensure the knots are consistent and even for a professional look. After attaching all the tulle, the waistband will hold the tutu in place with style and comfort.
Assembling the Tutu Skirt
Assembling your diy tutu skirt is an exciting stage. This is when your skirt starts to take shape and your efforts begin to show. There are different ways to attach your tulle strips to the waistband. Each method has its advantages, depending on the look and durability you wish to achieve.
Knotting vs. Sewing Tulle Strips
You have two main options for attaching tulle to the waistband: knotting or sewing.
- Knotting is a fast, easy method, ideal for beginners. Simply loop each strip around the elastic and pull tight to secure. Ensure each knot is firm to avoid slippage.
- Sewing requires more time and skill, using a needle and thread or sewing machine. Sew each strip onto the waistband for a flat, neat finish. This method is sturdy and long-lasting.
Choose knotting for a simple, no-sew project or sewing for a more refined, durable tutu.

Layering for Fullness and Fluffiness
For a full, fluffy diy tutu skirt, layering is key:
- Attach strips close together. This ensures your tutu is dense and voluminous.
- Mix lengths of tulle for a textured look. Varied lengths create depth and visual interest.
- Stack multiple layers. More layers mean more fluff. Consider double-layering strips for extra volume.
Remember, use your waist and length measurements to guide you. Always follow the pattern you envisioned and take your time. Your diy tutu skirt will soon be ready for twirling and whirling.
Adding Embellishments and Decorations
To add a unique touch to your diy tutu skirt, consider embellishments and decorations. These add flair and personality to your skirt, making it one-of-a-kind.
Ideas for Personalizing Your Tutu
Personalizing your tutu is about creativity and style. Here are some ideas:
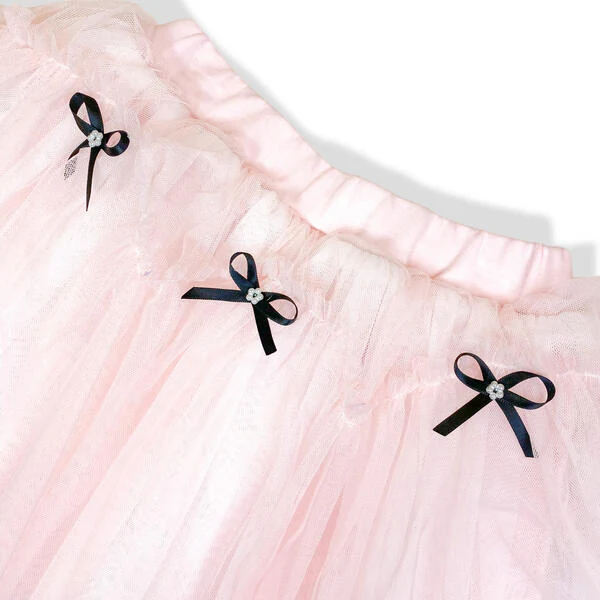
- Ribbons: Tie colorful ribbons in bows around the waistband or in the tulle layers.
- Glitter: Sprinkle glitter on the tulle for a sparkly effect. Make sure to use fabric glue to seal it.
- Beads and sequins: Hand-sew these onto the tulle for a dazzling look.
- Appliques: Use fabric appliques like butterflies or flowers to add a theme to your tutu.
- Fabric paint: Draw or stencil designs onto the tulle with fabric paint for custom patterns.
Select decorations that reflect the wearer’s personality or the occasion for which the tutu is intended. Remember, the key is to make the tutu skirt your own.
Attaching Decorations Securely
Ensuring that decorations stay in place is crucial. Here’s how to do it:
- Sewing: For beads, sequins, and appliques, use a needle and thread to sew them on firmly.
- Fabric glue: For ribbons, glitter, and lighter items, fabric glue can secure them without sewing.
- Heat seal: Ribbons can fray, so heat sealing the edges prevents this and extends the tutu’s life.
Always allow glue and paint to dry completely before wearing or storing your diy tutu skirt. This ensures that your decorations are secure and long-lasting. With each added embellishment, you’re one step closer to completing a truly personalized tutu skirt.
Caring for Your DIY Tutu Skirt
Creating a diy tutu skirt is an achievement on its own, but taking care of it ensures longevity and lasting beauty. Proper washing and storage are essential to maintain the skirt’s shape, fluffiness, and overall look.
Washing and Storage Tips
For washing your diy tutu skirt:
- Hand wash gently in cold water with a mild detergent.
- Avoid wringing or twisting the tulle to prevent deformation.
- Rinse carefully and remove excess water with a towel.
- Hang or lay flat to dry; avoid using the dryer.
When it comes to storage:
- Keep the skirt in a cool, dry place away from direct sunlight.
- Store it flat or hang it up to avoid crinkles and creases.
- If space is tight, gently fold and place in a garment bag.
Remember, taking care of your diy tutu skirt means you can enjoy it for many events to come. Treat it with love and it will stay as delightful as the day you made it.
Final Touches and Fitting the Tutu Skirt
Your diy tutu skirt is almost finished. The final touches will ensure a perfect fit and look.
Adjusting the Elastic Waist
To adjust the waist, try on your tutu. The elastic should feel snug but comfortable. If it’s too loose, remove a section and resew or retie the ends. For a tighter fit, stretch the elastic a bit more and secure it. The skirt should sit well and not twist or roll.
The Final Look: Styling Your Tutu Skirt
Your diy tutu skirt is now ready to style. Pair it with leggings and a cute top for a casual look. For a special event, add a satin ribbon or a sparkly belt. Choose shoes that match the occasion. Ballet flats are great for comfort. High heels can dress up the skirt for a formal event. Now, your beautiful diy tutu skirt is ready to wear and enjoy.